After reading our popular How to install Windows 7 Using USB Drive, readers are sending many emails asking me to write a guide on installing Windows 7 without using a DVD or USB Drive. So after reading those emails, I am starting this guide. I hope this guide will help many users to install Windows 7 on their PCs and Netbooks.
So you can continue this guide in keeping these three points:
* By using this guide, you will be able to install Windows 7/Vista, if you don’t have a DVD drive as well.
* You can also use this guide if you don’t have a 4GB USB stick. If you have a 4 GB+ USB drive, then try out my Install Windows 7 using USB drive for a quick installation.
* We are not using either CD/DVD drive in this guide so you can even use this method to install this method for Netbooks.
There are two ways to install Windows 7/Vista without using a DVD or USB. The first one is using VPC (Virtual PC), and the second one is mounting an ISO file using free tools like Daemon Tools or Virtual Clone Drive.
Installing Windows 7 Without Using a DVD or USB via Virtual PC method
In the Virtual PC (VPC) method, the only limitation is VPC doesn’t support 64-bit. So you need to use 32-bit guest OS only. That is, you can install VPC on 64-bit OS, but you can’t install 64-bit OS using VPC.
1. Download and install Virtual PC from here.
2. Run the Virtual PC software. To do this, type Virtual PC in Vista Start menu search box and hit enter.
3. Click the New option and click the Next button to continue.
4. Select Create a virtual machine option from the available three options. I prefer this option as this lets you customize as you like. Click Next.
5. Here, type a name for the new virtual machine. The file is automatically saved to the My Virtual Machines folder. To save it to a different location, use the Browse button.
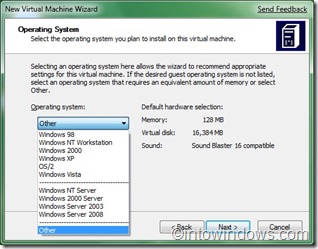
6. Select the operating system that you would like to install using Virtual PC from the drop-down box. In this tutorial, we choose the Other option since Windows 7 option is not available in VPC as of now. After selecting the operating system, click Next.
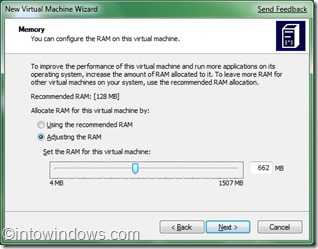
7. As you are installing Windows 7, you can’t use the default memory allocation, which is just 128 MB. I recommend at least 512 MB of memory allocation for Windows 7 to get decent performance.
8. In the next screen, select A new virtual hard disk and once again click the Next button.
9. In this step, browse the location where you want to create a virtual hard disk and specify a name for the virtual hard drive. Also, don’t forget to specify the size of the Virtual Hard Drive. I prefer at least 16GB (Recommended by Microsoft).
10. Click the Finish button.
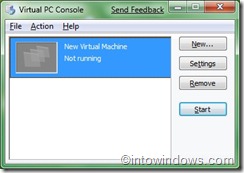
11. This will open a small window called Virtual PC Console. Click on the Start button to start the actual process.
12. Once you click the Start button, you will see Windows Console and also you will see “Insert boot media and click ” message in a few seconds. Generally we use Windows DVD to boot and install Windows, but here you can simply use the ISO file without burning it into DVD.
13. So click on CD and then select Capture ISO image and browse to the Windows 7 ISO file location and hit enter. Within a few seconds, you will see the Windows 7 installation process in the console. Once it’s started, you can follow the simple procedure to install Windows 7.
Note that you can’t use upgrade option and also can’t change the location of Windows 7 installation during the setup since you are using the virtual hard drive to install Windows 7.
You can also refer my Windows 7 installation procedure guide if you have doubts about the installation. Don’t forget to read how to create bootable USB guides.
Below is another way of installing Windows 7 without using a DVD or USB
Method 2: Installing Windows 7 without using a DVD or USB via the direct method.


