Almost all PCs that ship with Windows 8 operating system have a dedicated recovery partition consisting of crucial files required to reset or restore Windows 8 to factory condition. This recovery partition usually consumes around 15GB of storage space.
Since most of the PCs that are available today offer at least 500GB of storage space users may not feel the need to delete the recovery partition to free up disk space. But users who have purchased a PC with 64GB or 128GB SSD (Solid State Drive) may want to free up some space by deleting this recovery partition.
Since the recovery partition consists of recovery image and other important files, we need to first move the recovery partition to a USB flash drive before deleting the recovery partition. After moving the recovery partition to your USB drive, you can safely delete the recovery partition. You can then use the new USB recovery drive to restore your Windows 8 to factory settings.
Complete the below mentioned step-by-step instructions to move recovery partition to a USB drive and then delete the recovery partition in Windows 8.
Delete the recovery partition from your Windows 8 PC
NOTE: This procedure works only on Windows 8 and doesn’t work on Windows 7.
Step 1: Connect a USB drive with at least 16GB of storage space (you may need a USB with more storage space if your recovery partition’s size is more than 16GB) and backup all data to a safe location. This USB drive will be erased.
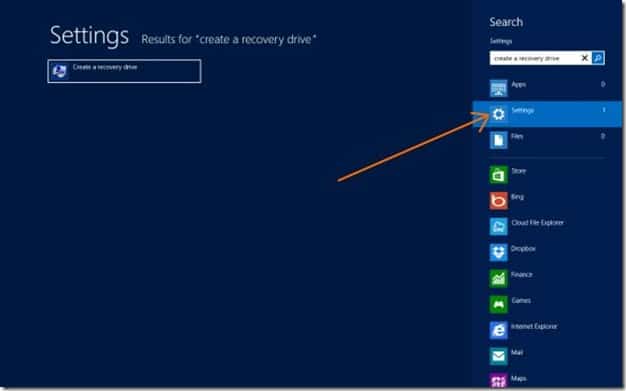
Step 2: Switch to the Start screen, type Create a recovery drive, change the search filter to Settings (see picture), and then press the enter key to launch Recovery Drive wizard. If you see the UAC prompt, click the Yes button.
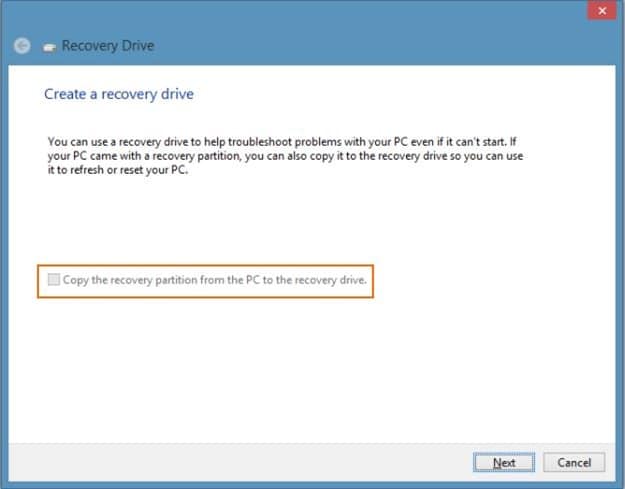
Step 3: Once the Recovery Drive wizard is launched, select the Copy the recovery partition from the PC to the recovery drive option and then click the Next button.
Step 4: Select the USB drive and click the Next button.
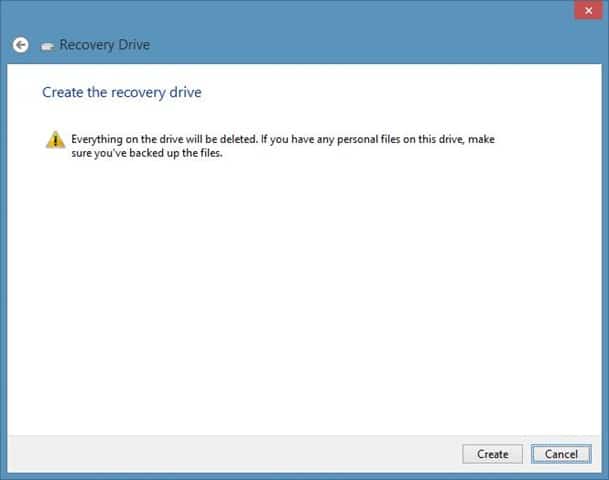
Step 5: You will see “Everything on the drive will be deleted. If you have any personal files on the drive, make sure you have backed up the files” message. Since you have already moved all data from USB, click on the Create button to begin transferring recovery partition to the selected USB drive. Depending on the size of the recovery partition, Windows might take few minutes to hours to complete the job.
Step 6: Once Windows completes copying the recovery partition to the USB drive, you will see “You can also delete the recovery partition on your PC to free up some drive space” message along with an option named Delete the recovery partition.
Step 7: Click Delete the recovery partition to see a warning message saying that “You can free up some drive space by deleting the recovery partition but you won’t be able to refresh or reset your PC again without the recovery drive”. Since you’ve already moved the recovery partition to the USB drive, you can safely delete the recovery drive.
Click Delete button to delete the recovery partition. Once the job is done, Windows will show you the amount of disk space you have gained by deleting the recovery partition. Good luck!
How to create Windows 8 recovery USB drive and how to create Windows 8 recovery DVD/CD guides might also interest you.


