Quick Access is one of the several new features introduced with Windows 10. As you might have noticed by now, when you click or tap the File Explorer icon in the taskbar or Start, Windows 10 launches Quick Access instead of This PC. The Quick Access folder displays recently used files and frequently used folders so that you can quickly open them, eliminating the need to navigate to file or folder’s actual location.
With default settings, Quick Access appears in the navigation pane of File Explorer (Windows Explorer) as well. The Quick Access list in the navigation pane shows desktop, downloads, documents, pictures, and up to four frequently used folders by default. While Quick Access is more useful than the now-discontinued Favorites, the problem with it is that File Explorer opens to Quick Access by default in Windows 10.
Not all users like seeing recently used files and frequently used folders upon launching the File Explorer. While it’s possible to navigate to This PC from Quick Access, users need to go through an extra step.
To take care of those users, there are options under Folder Options to stop displaying frequently used folders and recently used files in Quick Access. But if you prefer disabling Quick Access in Windows 10 so that you can directly open This PC by skipping Quick Access, you can do so as well.
In this guide, we will show how you can make This PC default in Windows 10 by disabling Quick Access as well as how to remove the Quick Access from the navigation pane.
Method 1 of 5
Disable Quick Access in Windows 10
Note that this method doesn’t completely remove the Quick Access feature. The feature will continue to appear in the navigation pane (left pane) of File Explorer. Please check Method 2 (scroll down to see) to get rid of Quick Access from the navigation pane.
Step 1: Open Folder Options. To do so, open File Explorer, click View, click the small down arrow icon just below the Options, and then click Change folder and search options to open Folder Options dialog.

Step 2: Under the General tab of Folder Options, select This PC from the drop-down box next to Open File Explorer to, and then click Apply button. That’s it! From now onwards, when you click the File Explorer icon or use Windows + E keyboard shortcut, Windows 10 will launch This PC instead of Quick Access.

Method 2 of 5
Remove Quick Access from the navigation pane
UPDATE: It’s now possible to completely remove the Quick Access from the File Explorer navigation pane. You need to edit the Registry to make it happen. Here is how to do that quickly.
Step 1: Launch the Registry Editor and navigate to the following key:
HKEY_LOCAL_MACHINE\SOFTWARE\Microsoft\Windows\CurrentVersion\Explorer
Step 2: On the right side, right-click on an empty spot, click New, click DWORD (32-bit) Value and then name it as HubMode.
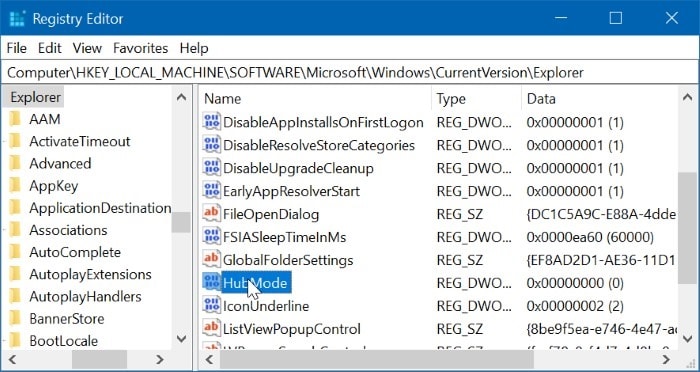
Step 3: Finally, double-click on the HubMode entry and set its value data to 1 to remove the Quick Access from the navigation pane of File Explorer.
Method 3 of 5
Remove a pinned folder from Quick Access
Step 1: Right-click on the pinned folder and then click Unpin from Quick access option.

Method 4 of 5
To Stop Windows 10 from showing frequently used folders and files
Step 1: Open Folder Options by following the steps mentioned in Method 1.
Step 2: Under the General tab of Folder Options, uncheck options titled Show recently used files in Quick Access and Show frequently used folders in Quick Access.

Step 3: Click the Apply button. That’s all!
Method 5 of 5
Turn off Quick Access via Registry
In this method, we edit the default values of the Windows Registry. We recommend you create a manual system restore point before making changes to Registry. Note that this method doesn’t remove Quick Access from the navigation pane.
Step 1: Open Registry Editor. To open it, type Regedit in Start menu search box, and then press Enter key. Click Yes button when you see the User Account Control box to launch Registry Editor.

NOTE: One can also type Regedit in Run command box and then press Enter key to open Registry Editor.
Step 2: Navigate to the following registry key:
HKEY_CURRENT_USER\SOFTWARE\Microsoft\Windows\CurrentVersion\Explorer\Advanced

Step 3: On the right side, look for the entry named LaunchTo. Double-click on it and change its value to 0 (zero) to turn off Quick Access.

Do you find the Quick Access feature useful?