These days, a large section of PC users are using USB drives as bootable media to install Windows 10. USB installations are usually a bit faster than traditional DVD-based installations, meaning you can quickly install Windows while using USB as bootable media.
That said, not everyone has a spare USB key all the time. At times, you might need to burn a DVD to make it bootable and install Windows 10 from the same.
Having a bootable Windows 10 DVD makes sense if your PC doesn’t support booting from USB or if you often need to install Windows 10 but don’t have the time and patience to create bootable Windows 10 USB each time before installing Windows 10.
If you don’t have the Windows 10 ISO file already, refer to the directions in our how to download the latest version of Windows 10 ISO from Microsoft guide.
Method 1 of 3
Prepare Windows 10 bootable DVD from ISO
Go for this method if you’re on Windows 7, Windows 8/8.1, or Windows 10. In this method, we will use the native ISO burning tool to prepare a bootable Windows 10 DVD.
Step 1: Insert a blank DVD into the optical drive (CD/DVD drive) of your PC.
Step 2: Open File Explorer (Windows Explorer) and navigate to the folder where the Windows 10 ISO image file is located. Once again, if you do not have the Windows 10 ISO file, you need to get it from Microsoft. Refer to our how to download Windows 10 ISO file guide for step-by-step directions.
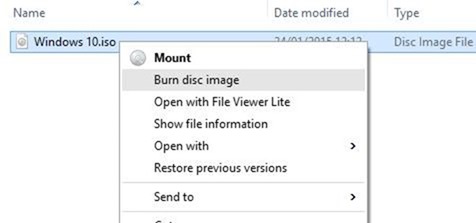
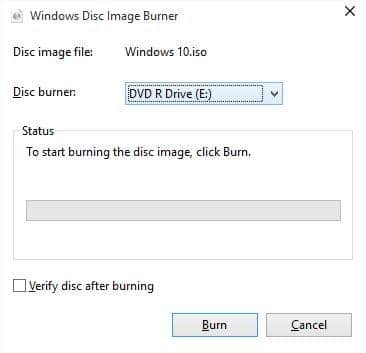
Step 3: Right-click on the ISO file and then click the Burn disc image option. This action will open the Burn Disk Image or Windows Disc Image Burner (in Windows 8/8.1) dialog.
Note: If the Burn disc image option is not appearing in the context menu when you right-click on the Windows 10 ISO image file, please follow the directions mentioned in our fix to burn disc image option missing from the context menu guide to resolve the issue.
Step 4: Here select your DVD/CD drive from the drop-down box next to the Disc burner.
Step 5: Finally, click the Burn button to begin creating your bootable Windows 10 DVD.
Once the bootable Windows 10 DVD is ready, you need to make appropriate changes (change the boot priority to CD/DVD) to the UEFI/BIOS to boot your PC from the bootable DVD to begin installing Windows 10.
Method 2 of 3
Bootable Windows 10 DVD using ImgBurn
If you’re having issues with the method mentioned above, you can use a third-party ISO burning tool to prepare a bootable Windows 10 DVD. There are plenty of free tools available for the job. In this method, we are going to use a free software called ImgBurn.
Step 1: Download ImgBurn from this page and install the same on your working Windows 7, Windows 8/8.1 or Windows 10 PC.
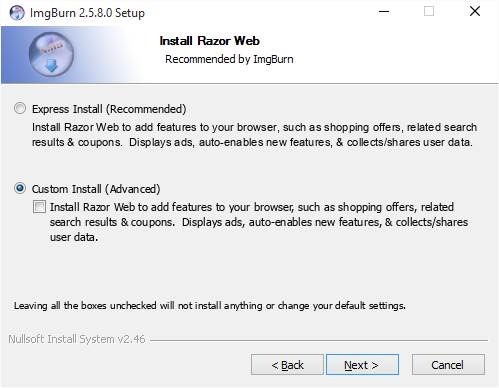
WARNING: The setup of ImgBurn (at least, the current version) tries to install the Razer Web browser plugin. While installing ImgBurn, select the Custom install option and then uncheck the option titled Install Razor Web option.

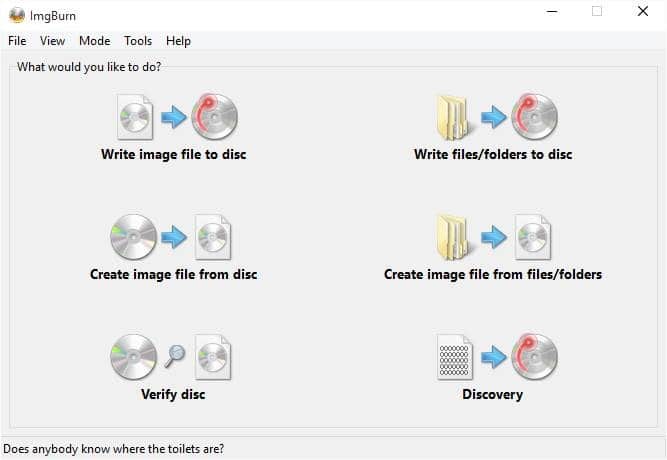
Step 2: Launch the ImgBurn application. Click the option titled Write image file to disc.
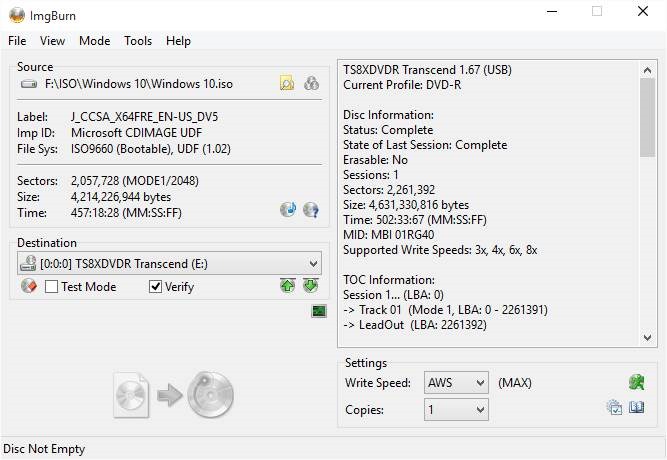
Step 3: Next, click the browse button in the Source section (see picture) to browse to the Windows 10 ISO image and select the same.
Step 4: Finally, click the Write button to begin burning the bootable Windows 10 DVD.
Method 3 of 3
Bootable Windows 10 DVD from installation files/folders
If you have files and folders extracted from a Windows 10 ISO image (installation files of Windows 10), you can create an ISO image out of it by following the directions mentioned in our how to create bootable Windows ISO image from files/folders guide. The guide uses the above-mentioned free ImgBurn software, which is very easy to use.
